In September 2010, as part of the second year of my Architecture degree, I decided to take part in a social architecture project based in South Africa as part of a team of 50 second year students. The project involved designing and building an Early Learning Nursery in Limpopo, a rural and underdeveloped province in South Africa. In cooperation with Education Africa, we collectively raised £70,000 to cover construction and material costs. This money was match funded by the university which resulted in a budget of £140,000 for the project.
The design stages of the project was in a competition format in order to get the best design from the group to be developed. The images below display my initial designs for the project:


The group of 50 students were divided into groups of approximately 5 so that each group could develop one of their team member’s designs. Fortunately, my design was chosen to be developed by my group, “The Chiefs”.
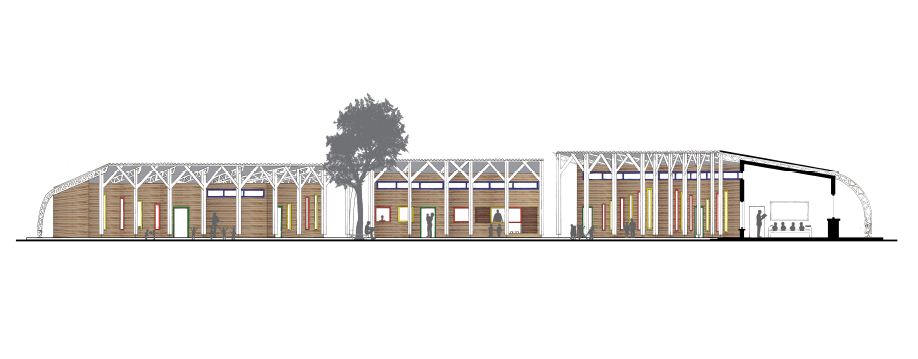
Description of The Chief's final proposal: “Our design is an innovative solution that has been created for ease of construction for our unskilled construction team of students. The suitability of the design is heightened with it being a competent scheme that embraces sustainability, tradition, the user, local materials and education all around the focal tree of the site, which is reflected in the structural gum pole columns and building layout. The building is broken down into standardised modules for ease of construction.
The Classrooms have been designed to be multi-functional spaces, maximising the usability of the school. The sequential gum pole columns provide a large overhang to produce a covered walkway, connecting the school in a shaded environment. Additional shading is provided by textile trapeziums hung between the buildings. The inclusion of rammed earth tyre walls act as a unique form of thermal mass- helping to stabilise the dramatic daily temperature changes as well as warming the classrooms in the evenings when the community will use the building. This interesting use of a waste material will help reduce landfill of waste tyres.”
"The Chiefs" final crit


In January 2011, the tutors of the project and heads of architecture of the University judged the groups final proposals and decided that the “structural resolution” of mine and my group’s design was to be combined with the concept of another. I was extremely proud and pleased that all of the hard work put in since September of the previous year had paid off.
A group of 5th years then further developed the design. This was to resolve some of the details and make the nursery easier to construct.


March 27th 2011: Departure date to South Africa! The morale of the group was high when we arrived at the airport. I was quite nervous but very excited to arrive in South Africa and see the site after such a long time researching the area and designing the nursery.
Arriving in Calais village and meeting the locals!


The Client!


Day 2 review:
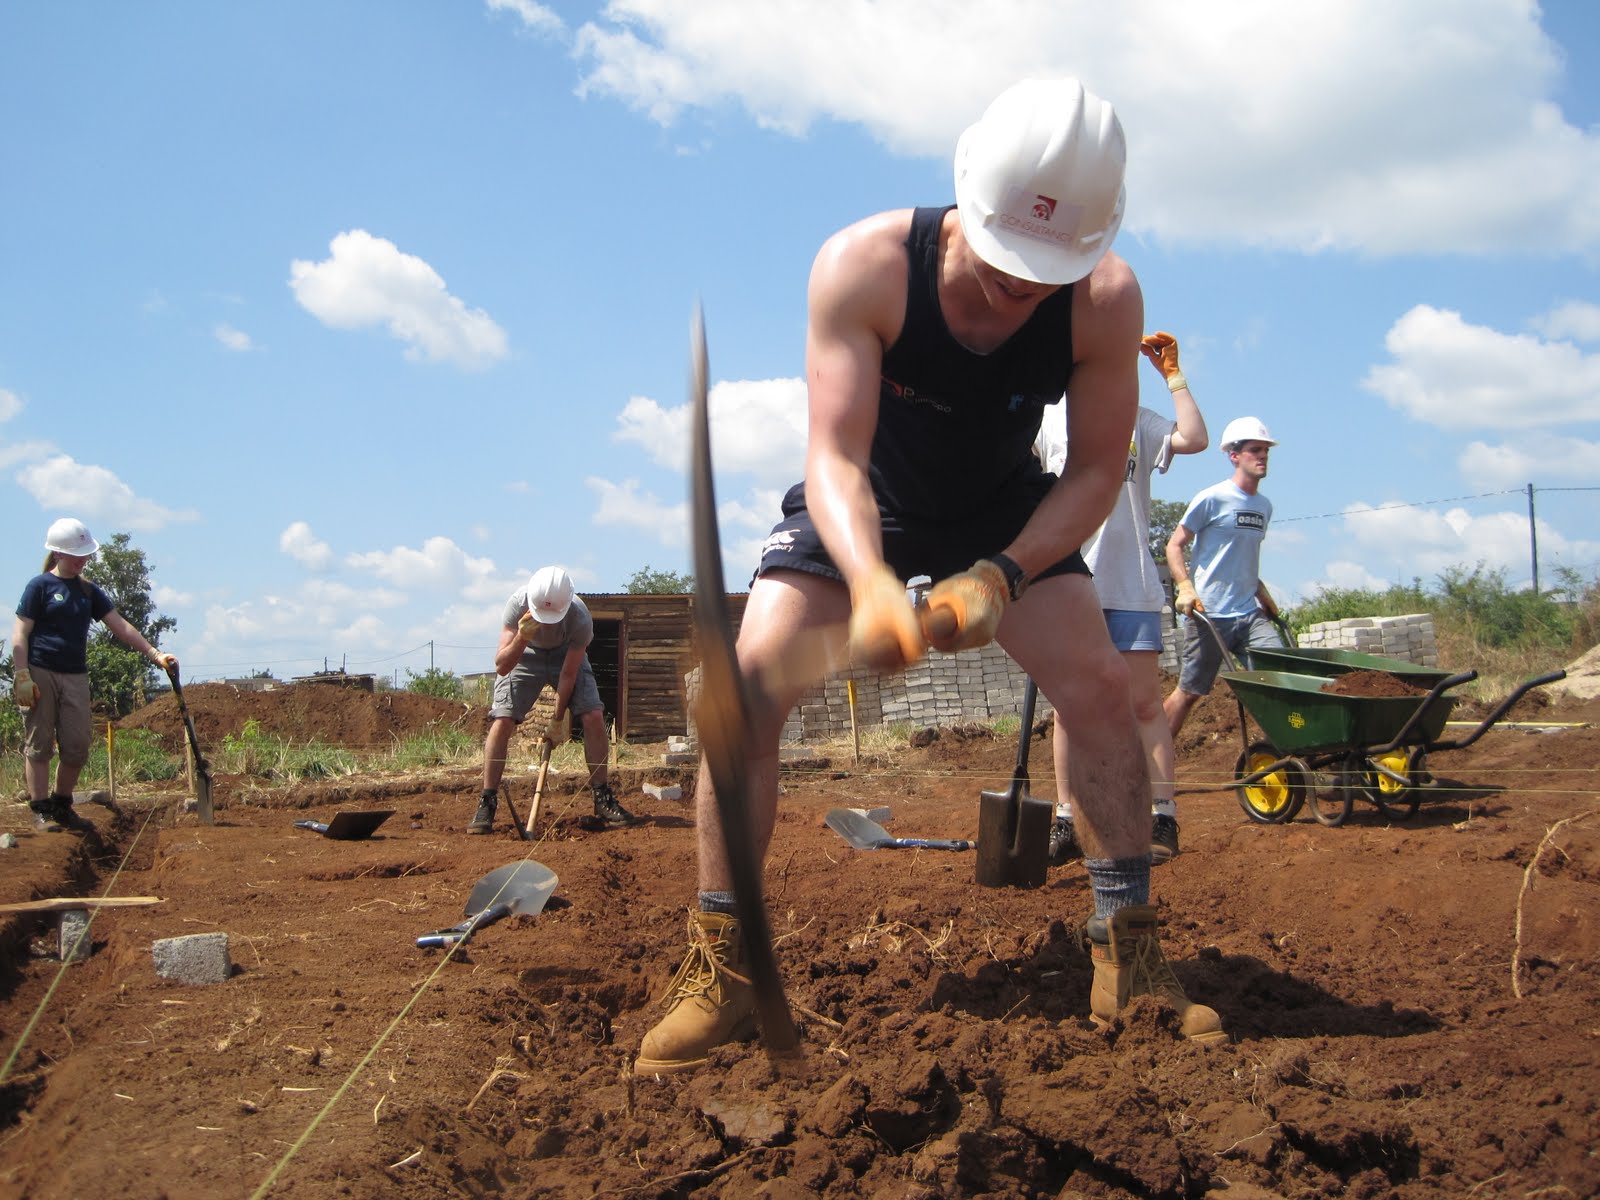
Digging the trenches for the toilet block
Digging the trenches for the toilet block
Securing the footings for the gum pole shelter


One of the tasks during the trip was to build a workbench to produce a safe and sturdy surface to construct the roof trusses


It was important to have a flat and dry surface to assemble the trusses. The image below shows the team laying the herring bone paving

Finished gum pole shelter, herring bone paving and work benches

Toilet block trenches ready for concrete

Day 12 review:
In the early stages of the trip, the timber required for the toilet trusses needed to be quantified. I volunteered for the role as I had no experience of quantifying and thought it would be an interesting challenge. I combined the numerous pieces of truss so that one truss could be constructed out of 6 x (6000 x 38 x 152) and 1 x (3300 x 114 x 38). I learnt that it was better to order the same size lengths of timber to avoid error at the Sawmill and improve ease of marking up. I was fortunate enough to see the whole cycle of this element of the building as I was nominated to visit the truss factory with Dale, the 5th year who designed the trusses. It was thoroughly interesting to speak to the manufacturers and see where the truss designs are produced in the computer suite to the factory where they are fabricated. When we arrived in the factory we were given a slot in the production line to cut our own timber using the factory’s own machinery. The machinery in the factory was far more advanced than the circular saw on site so this saved a lot of time and enabled greater accuracy when cutting the timber.
The timber was stored ready to be taken on site for the Monday morning. Like many other promised deliveries, the timber didn’t arrive on time but when it did, I was very pleased to see it from the design stages to be ready to be assembled on site.


During the middle of the trip, we had the opportunity to go on safari in Kruger National park


Truss workshop in action

Production line of the truss:
1) Measuring the timber

2) Cutting the timber to the right size

3) Drilling the larger holes for the countersink using a hand drill

4) Drilling through the timber for the bolt connections using the pillar drill

5) Assembling the roof trusses


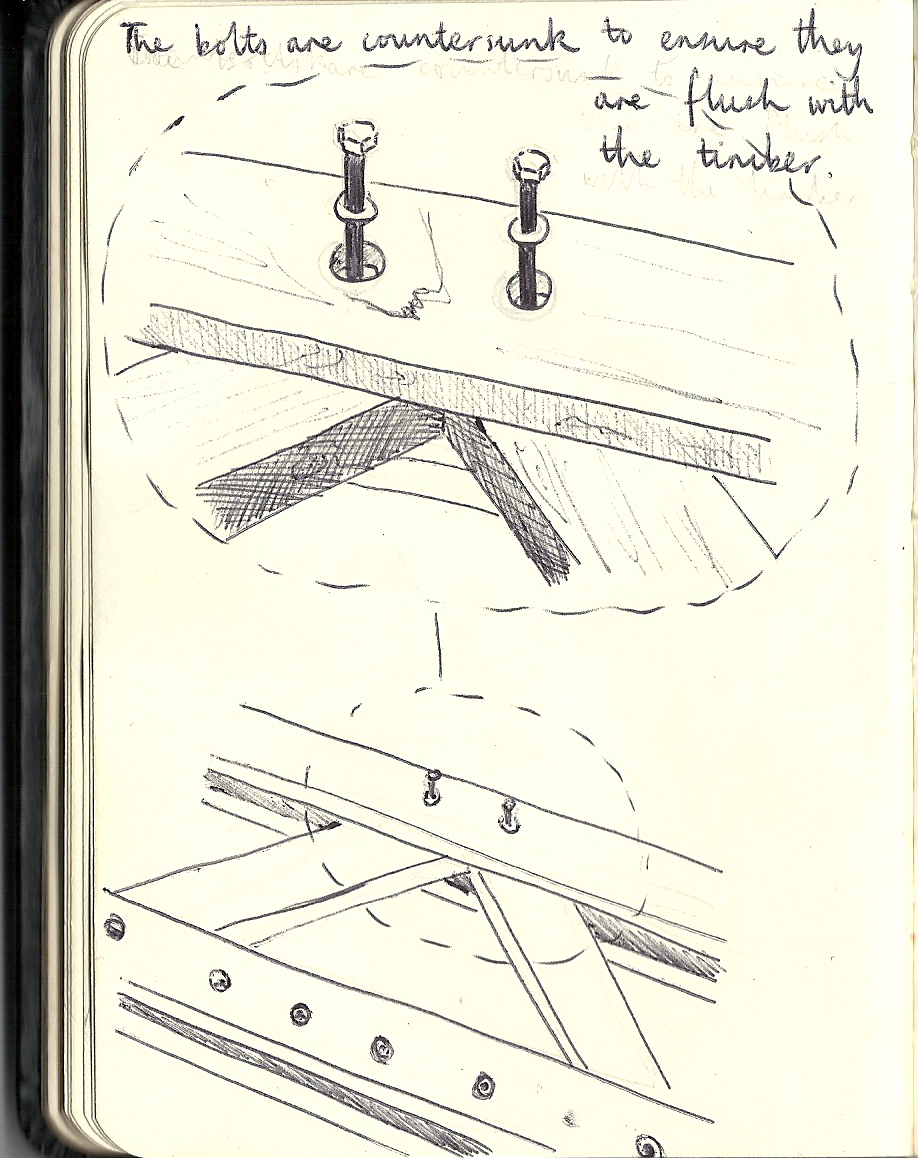
Closer look at the connections for the roof trusses:
Day 20 review:


After doing a lot of hard graft digging the trenches, we finally had something to be proud of and the morale of the group improved considerably as can be seen from the group photo below.

Building in South Africa
The main issue that we faced while building in a rural village in South Africa was delays with the delivery of materials. The South African construction industry is very wary of new customers as a lot of companies in the past have been dishonest and not supplied the agreed materials or money. This put us in an unfortunate position as we were left waiting for the timber for the classroom trusses and the concrete. On a project with a very strict timescale, delays in delivery of materials really puts the project at risk of not getting completed on time.
The timber for the classroom trusses were a week delayed because although Selati agreed that we had paid them, the money hadn’t gone into their account. However, when the money had finally transferred into their account, the timber was delivered to site. We were slightly disappointed with the timber that arrived as some lengths were severely warped. This project has taught us that building in a rural location forces you to work with the materials and tools you are given.
The concrete supply difficulties were compounded when the regional batching plant in Tzaneen suffered a water supply failure. This pushed the delivery of concrete back to Wednesday evening which resulted in the contractor and his team working throughout the night to lay and power-float the first classroom slab.
The water supply difficulties in Tzaneen resulted in sudden loss of water pressure in Calais village, leading to the site water storage tank being drained of its limited volume of water. Convoys of villagers immediately started pushing wheelbarrows filled with plastic water containers to and from the local river, obviously familiar with the unreliable mains supply.
We learned the generic reply to delivery delays, empty promises and unexpected situations to be: “TIA – This is Africa!”
Classroom foundation ready for the concrete

The long awaited delivery of the concrete:

Smoothing the classroom concrete slab


Lack of utilities on site slowed down progress of the build. When John Edmonds visited Calais village in January, he was assured that the site would have mains electricity and running water. However, as with many things that are promised in Africa, it didn’t come to fruition. The lack of mains electricity meant that a petrol generator had to be used to power the circular saw and pillar drill. This was an extra cost on an already stretched budget. The running water turned out to be a water storage tank which was suitable for tasks requiring small volumes of water but for tasks demanding a lot of water such as laying the concrete, the storage tank was not suitable. The water storage tank was located on the Southern boundary of the site and can be seen on the left hand side of the image below:

My highlight of the trip was welding the steel shuttering together for the classroom foundation. During the spring term I had undertaken a four week course in welding and pipe fitting as part of the MEng course. After speaking to the contractor, he was enthusiastic to allow me to unleash my new found welding skills on the steel shuttering. It was fantastic to put into practise a new-learned skill and the contractor and I were very pleased with the result.

Traditional building techniques: Hot climate construction
After studying many of the local buildings, it became apparent that environmental design plays an important role in the building design process. Ventilation and shading are vitally important as the African sun can cause buildings to overheat very quickly.
The local restaurant roof detail below shows that the designer had obviously taken the environmental design of this building very seriously. Gum poles have been used as part of a composite roof: the gum pole acted as the structural member of the roof allowing a void for the air to travel through and out of the roof. The design works because the air is drawn up and through the void by the temperature difference of the surface of the roof (which in many cases in corrugated iron) and the internal temperature of the building. This movement of air cools down the building by taking hot air out of the building. Moreover, the thatching on this roof acts as insulation to keep the building warm at night when the temperature drops and keep the building cool by blocking the intense heat of the day out.

The importance of ventilation is highlighted in the roof truss detail from the Selati Saw Mill seen below. The vent in the top of the roof allows air to travel up though the factory and cool the building down without letting the rain in. I think this roof detail highlights a fantastic piece of environmental design and clever engineering.


The Thusang Centre
The Thusang Centre is an education centre with the aim to teach local African people to be teachers and classroom assistants. It has proven to be very successful as it has helped to improve the Education system in the Limpopo region. The plan below shows that the building revolves around a central courtyard which is a very sociable place. Shade was obviously considered as an important factor as a shaded walkway was incorporated around the perimeter of the building, a similar design feature to our nursery!


Connected to the Thusang centre is the school designed by the Austrian University. It is evident that a lot of thought was put into the tectonic details of the building, such as the slim, elegant steel footings:

Ventilation was a vital part of the environmental design of the building. The buildings are laid out under the timber roof leaving a large air gap for cross ventilation to occur.

The windows have been made a feature of the design by framing them and extending them out of the walls. I really like the detail of the window box that has been made into a bed.


Church roof detail
I found the roof construction of the church fascinating. Although the materials available were limited and the accuracy and finish of the labour is poor, the villages of Calais have produced an aesthetically pleasing, structurally sound roof detail.

Panoramic of the site after 3 weeks:


Phase 2
The Phase 2 team had to perform the ritual dance in order to be accepted on site by the "Chief" Paul:
Now the roof trusses had been assembled, the Phase 2 Team's first job was to construct the columns and erect the trusses on the newly finished classroom foundation.


Attaching the purlins to the roof trusses


Window frames for the clerestory glazing

Constructing the heavy weight wall that runs along the north facade of the classrooms. The heavyweight walls were installed as an environmental strategy to help stabalise room temperature throughout the day and evenings. This is achieved through the thermal mass; the heavyweight walls capture the heat from the sun during the day and then release it slowly during the evening when the ambient temperature is lower providing a more comfortable space for the community using the classrooms for meetings and performances.


Toilet block trusses erected


All the exposed timber which was untreated needed to be primed in order for the coloured paint to take to the wood. Once dry a small team painted the timber, both protecting it and adding aesthetic interest to our nursery.

A design decision made on site was to use timber baton for cladding the south facade to contrast with the metal cladding elsewhere and add interest to the elevations.

As the nursery is to be used by young children we painted the timber window frames in bright colours- one classroom orange, one blue. The image below shows a fnished classroom panel


The final result after 6 weeks

Contrasting to the smooth timber batons on the south facade, the shiny, corrugated steel cladding and coarse brick work provide a range of textures and colours, adding excitement and interest to the elevations.


To conclude, the 3 weeks I spent in South Africa was an unbelievable experience. Learning about a totally different culture, building in a rural environment and working in a team have improved my understanding of how difficult it is to project manage and build a project in an environment unfamiliar to you with a team with very little building experience. Although there were setbacks with material delays, I think we can be extremely proud of what we achieved and Phase 3 of the build will hopefully be able to finish the nursery which shows so much potential after 6 weeks of construction. Overall, I am extremely pleased that I chose to be part of Project Limpopo. Taking the building through from its design stages to flying out to South Africa and building it was a fantastic learning experience and I would jump at the chance to be part of a similar project.
After completing Phase 1, I was lucky enough to get the opportunity to go back to Calais Village to finish the classrooms and toilet block in Phase 3 of the construction.
After completing Phase 1, I was lucky enough to get the opportunity to go back to Calais Village to finish the classrooms and toilet block in Phase 3 of the construction.