In August 2011, I was given the opportunity to go back to South Africa and take part in Phase 3 of Project Limpopo. The aim for Phase 3 was to finish the interior of the two original classrooms, build the toilet block from the skeleton erected in Phase 2 and fabricate a third classroom from scratch. This was extremely ambitious with a small group of 11 students and only 11 days on site. This is what we achieved:
Completed third classroom:


Completed toilet block:

Final view of the three classrooms:

Have a look at a short film on the project here:
First day, views of the site:


Interior view of the orange classroom:

It was great to see what Phase 2 achieved back in April but after looking closely, it was evident that there was still a great amount of work to do to finish the interior of the classrooms.
Half of the group was given the task of finishing the interior of the two classrooms. This involved fitting insulation and a deep proof membrane into the timber stud wall and an internal ply wood cladding:


Local workers helped to render the brick work of the original classrooms to leave a nice smooth finish:


TOILET BLOCK
First day, view of the skeleton of the toilet block:
Sam, Nick and I were keen to add to the skeleton of the toilet block by fabricating the block wall, timber stud walls and plumbing of the toilets.


The first task was to build the block wall:

As we had very little bricklaying experience, we worked with the local workers to fabricate the block wall in between the timber trusses up to chest height to allow a solid fixture for the toilets. I really enjoyed constructing the block wall and made a considerable improvement throughout the day.


The walls were rendered to leave a smooth finish on the internal walls of the block wall. We used the local rendering technique of "slapping" the render onto the wall. The local workers showed us how to render the block walls:


The toilet block consists of 4 separate sections: Adult toilets, girls and boys toilets and a store room with a sink.

Plan and side elevation of the proposed design:


One of the design challenges on site we faced was to design the entrance of the toilet block. After many different possible designs, we decided on a timber screen set in front of the main elevation of the toilets. When designing the screen, the key design features of circulation, ventilation and privacy in mind.
Plan and side elevation of the proposed design:

Front elevation:

A timber sill was constructed on top of the block wall and frames added to the east and west facades to make a connection between the block wall and the timber truss. Vertical batons were inserted in the frame for stability and insect mesh stapled to the frame. Horizontal batons were added to the frames to reflect the south façade of the classrooms and add privacy to the toilet block.


Tectonic detailing of the toilet block:
Photo by Nicholas Gaston

Setting out the toilets in the toilet block:

Holes were drilled in the block wall to provide a passage for the toilet pipes to the septic tank. When the toilets are connected, they will be the only flushing toilets in the village.
Photo by Nicholas Gaston


The door frames of the toilet block were painted yellow to compliment the bold colours used on the classrooms:
Photo by Alix Blankson

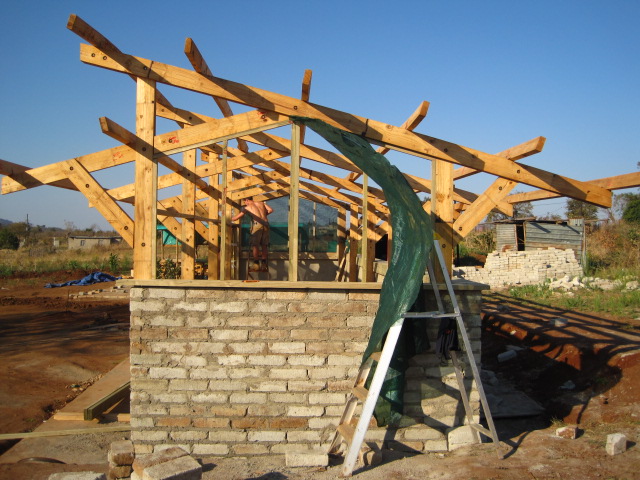
THIRD CLASSROOM
To enable the children to move into the school, a third classroom had to be built. Therefore, work immediately started on the trusses for the third classroom which would be 2/3 of the size of the other two classrooms.

Using the angle grinder to get the bolts flush with the surface of the truss:
Photo by Alix Blankson

Detail of how the truss is fabricated:

Once the trusses were fabricated, work started on the columns which connect the trusses to the steel fittings in the foundation. A problem occurred when the column didn’t meet up with the steel fittings of the foundation. This meant that new holes needed to be drilled into the foundation and the column attached further down the truss.
Day 4 review by John Edmonds:
Day 5 review: Being greeted by the children of Calais village
Concrete steps linking the higher level concrete to the third classroom:

Once the columns were connected to the truss and ropes attached, the team was set to lift the truss in place.


Day 9: Lifting the truss by Fatima Ladak
New concrete was poured in between the two original classrooms to finish the floor in the office:

New concrete steps were constructed to link the third classroom with the two original classrooms:

When the four trusses were erected and secured to the foundation, the truss team were able to start constructing the timber stud walls, block walls on the north façade and roof purlins.


North side of the green classroom:
Photo by Alix Blankson

Internal views of the third classroom:


On the last day, windows were fitted to the original classrooms which really brought them to life.
Photo by Nicholas Gaston

Panoramic of the site on the final day:
Photos taken by Nicholas Gaston on the water tower

South African Life
When we weren’t on site, we were able to explore the surrounding area of Tzaneen and experience the South African culture. Hunting in the bush, Tzaneen air show, sampling the local food and drink and having a braai with the locals gave us a real taste of South African life.


Overall, I'm really pleased that I took part in Project Limpopo and proud of what we achieved in Phase 3 of the build. We had a very ambitious target and achieved a commendable amount with a small team and limited time frame. Dale, our local contractor will oversee the completion of the nursery which will include fitting the windows, doors and the roof.
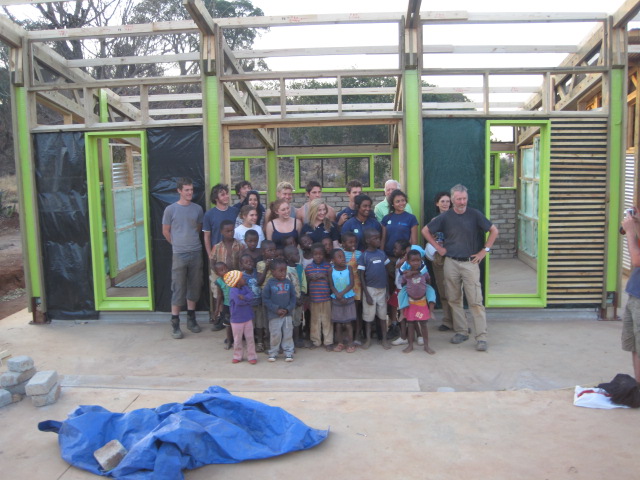
It was fantastic to see the children of Calais village excited to move into the nursery that we helped to design and build. It makes me very proud to think that the nursery will benefit their lives and improve the lives of the future generations of Calais village.


The Phase 3 team with the local children in front of the new green classroom:


